Chevrolet Malibu Forums banner
Status
Not open for further replies.

How-To LED blinker installation in mirror housings

102K views 76 replies 21 participants last post by  DrivenDaily 
#1 · (Edited)
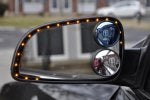
LED BLINKER INSTALLATION IN MIRROR HOUSINGS

(Multiple posts - limited to 4 images per post)

Also, either start the car or have a battery trickle charger running. I didn't and had to use my phone to get a jump! DOH!


I soldered every connection. I used a butane soldering iron and rosin core solder.

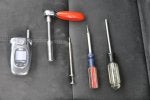
Some of the tools you'll need are razor, Torx T25 screwdriver or socket, small flat screwdriver, 1/4-drive ratchet with short extension, 10mm deep and 7mm sockets, small "poker", soldering iron, solder, heat shrink tubing, stranded wire (18 to 24 ga.), prep pads or spray, 2-pin plug sets (2 needed), "LEDLITZ" flexible LED strips (amber or red) or similar (purchased mine at Auto Zone) Make sure they are the kind that you see from the edge, not from the top!

Long-term note: Use stranded wire, not solid. Stranded takes the abuses of movement better and you don't want to have to fish more wire when the solid breaks in half!

-- 01 Tools needed to work on doors

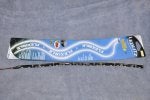
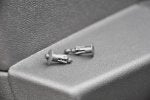
-- 02 Flexible LED for mirror blinker


Getting started:

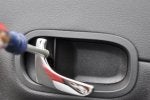
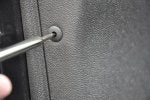
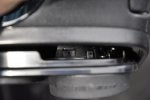
Use flat screwdriver to pry off door release cup cover plate. Pry at rear ONLY, please!

-- 03 Removing door pull cup inside plate


The cover has 2 attachments - DO NOT pry from the front!

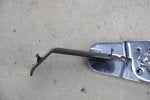
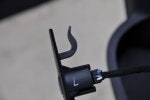
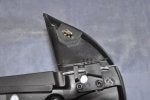
-- 04 Door pull cup plate detail-passenger side (being held by chrome wire stripper/cutter)
 

Attachments

See less See more
4
#2 · (Edited)
Re: no side marker - add side bliner in Mirror?

Use flat screwdriver to remove rubber screw cover inside door pull cup. Use T25 Torx to remove 2 screws.

-- 05 Door pull cup without screw cover


Lift on rear of switch panel straight up, then slide rearward to slide panel clip clear of front attachment stud.

(Front clip - passenger side)

-- 06 Switch panel front clip-passenger side

(Front stud - passenger side)

-- 07 Switch panel front attachment-passenger side

(Lifted at rear and sliding rearward - driver side)

-- 08 Removing switch panel-front clip
 

Attachments

#3 · (Edited)
Re: no side marker - add side bliner in Mirror?

Use "poker" (I used terminal remover for plugs installed in this mod) to press center of plastic rivets on rear edge of door panel. Press until it just pops in "one click". Center of rivet might exit rivet if pushed too far.

-- 09 Plastic rivet on edge of door-disengaged

(Both rivets - left one is "out", ready to reinstall; right one is "in", ready to remove)

-- 10 Plastic rivets-1 disengaged 1 ready to insert


There are 6 panel fasteners, plus one holding the sail panel covering the mirror attachments. Grab bottom of panel at pocket and pull away from door. Then use finger tips to pull sail panel away from door. Keep panel from dropping suddenly.

(Sail panel from back - passenger side)

-- 11 Door panel mirror cover from back-passenger side

(Inside look at passenger side with panel completely removed. You don't need to remove latch cable to do this mod - I did it to show you.)

-- 12 Inside door with panel removed-passenger side
 

Attachments

#4 · (Edited)
Re: no side marker - add side bliner in Mirror?

Use 10mm deep socket to remove 2 exposed washered nuts behind sail panel. Forward of them is a plastic cover. Remove it to expose 3rd washered nut. When loose, use finger under washer to hold it in socket so it doesn't fall inside door. (Magnet optional.)

Unplug mirror control wires. From outside, pull mirror from door. Remove foam packing that surrounds wire loom, between housing and door.


Refer to pictures below:

Press mirror as if adjusting it so you can see inside "straight" edge that is nearest window. There are 8 plastic clips holding mirror to motorized mount. You need to loosen only 2. Easiest ones are seen below. Use small flat screwdriver to gently pry them away while pulling with slight pressure on mirror glass. Once both are loosened enough, glass will easily be pulled away from mount.

(Looking at 1 clip inside driver side mirror. It is just to right of center of image.)

-- 13 Drivers mirror inside look at clips


(Back of mirror glass assembly with 8 fastening clips - driver side. You will pry off the ones at the ~8 o'clock and ~10 o'clock positions. Passenger side similar.)

-- 14 Back of drivers mirror

(Motorized mount inside housing - driver side. The clips you pry fasten in at the ~2 o'clock and ~3 o'clock positions. Passenger side similar.)

-- 15 Mirror housing-no glass-driver side
 

Attachments

#5 · (Edited)
Re: no side marker - add side bliner in Mirror?

You do not need to remove the body-color housing cover unless you just really want to. I removed it on the passenger side but not on driver side. Here is how it looks removed.

-- 16 Mirror inside under cover-passenger side

-- 17 Painted mirror housing cover inside detail
 

Attachments

#6 · (Edited)
Re: no side marker - add side bliner in Mirror?

With glass removed, clean the inside of the housing thoroughly. Use prep spray or wipes to remove molding release agents and any residues. Follow instructions. I used SEM 38343 VINYL PREP Professional Vinyl Prep and Conditioner. Picked it up at auto body paint supply. $12/can. Overkill for this project, but I already had it when I installed wood dash overlay kit, so why buy more? You can probably also use Duplicolor or Krylon product. Biggest concern is not leaving oily residue, since the LEDs are attached with 3M tape.

This step is optional, but done to hide being able to see any wires from exterior after mod: Put 6-8 inches of shrink tubing over wire nearest strip, butting it up against theirs, then heat shrink it. Place 2 inches of a slightly larger diameter piece over the joint between the two. (Didn't do that on passenger side, but did it on driver side. Drat!) Heat shrink it also.

Now install the LED strip. See detail below for placement. Dry fit first with paper backing still on. Look at end result of my mod to see if you want to shorten it to taste or use full length.

-- 18 Mirror inside detail with LED installed

Once position is decided, notice 2 bumpers at top of housing. This is how far back you will install strip. Use it as a guide. Start at side nearest window as viewed when mounted on car (left in image above) and peel a little of the paper away. Using bumpers as guides, press end of strip to housing. Peel a little more paper and press strip into corner. Make sure not to allow strip to pull away from corner. Press firmly and hold for about 5-10 seconds. Peel more paper along top and press, using bumpers.

When you get to final sharp corner, make sure to press firmly into corner (again). Once fully positioned, go back over front and rear edges of entire strip to ensure that entire strip adheres to housing. You want to prevent water from getting under lips and gradually loosening it.


On underside of housing there is an oddly shaped cover. Use small flat screwdriver to pop it out. Patiently work wire loom through openings so it has a straighter path to inside of housing.

Push the loom up a little so you can get the top end into the inside of the housing. With a razor, carefully and lightly slice the top 3/4" of tape securing the loom cover, then peel it down to expose the end of the opening.

Use a piece of solid-core wire (I used 18 ga.) and fish it inside the loom cover from the plug end. When it comes out the top (remember, be patient!) pull about a foot or more out. Wrap the LED wires around the fish wire for about a foot, then tape it. I ran my tape lengthwise, then folded it kinda like a taco. (Gratuitous food reference here. Yep, I'm a guy!) Make sure no adhesive is left exposed, and make sure the leading end is as small as you can make it.

(Fish wire wrapped, after being successfully pulled. Fish wire on left, LED wire on right. Reference length on sill.)

-- 19 Mirror LED wire successfully fished


Now fish the wire through the loom. When both wires are first entering the end of the loom, help them as needed so they don't cluster up. It might come undone as it goes through, so pull firmly but don't jerk it. Remove tape and fish wire. Important! Tape end of loom to prevent moisture entering.

Reposition loom in original position and check that you have just enough, but not too much, LED wire so it doesn't bind and isn't excessive enough to get in the way of mirror operation. Both strips I used were identical, not "left" and "right" versions, so the passenger wire attaches to the strip at the bottom of the housing and the driver side attaches up against the window side. This means different routing on each side unless you find a product that is "left" and "right".
 

Attachments

#7 · (Edited)
Re: no side marker - add side bliner in Mirror?

Do not reattach the mirror glass yet. It just snaps on, so it can wait until the end.

Put foam back in place. Do a good job so it keeps moisture from entering door cavity. Place mirror on door and check for any material sticking out that shouldn't. Reattach with all 3 nuts. (Doh! I left off 2 of them and had to remove the door panel to tighten them. Dang!) Do not overtighten. They may be metal studs but they're mounted in plastic.


You will now make a path for the wire from the door to the body, at the wire loom:

Use 7mm socket to remove speaker screw. Once loose there is a snap keeping it from falling out. Firmly pull top of housing, then lift up. You may unplug the speaker or let it hang out of the way.

Reach inside cavity with one hand, with other help to work round wire loom grommet out of door. Up against the body is a rectangular grommet. With fingertips work top edge of flange away, then slightly pry a gap. In center of top of gap, press with small flat screwdriver to release clip holding it in. Use your wits here, this one is a little tricky. There's a large locking connector just inside the opening, and it comes out with the end that you're working on. (You do not need to release the connection unless you want to.) Peel back the rubber from the end so you have a clear path from top to bottom of the loom. Fish a wire through (I taped it to a large Phillips screwdriver - round so it didn't damage inside) and use that to pull some STRANDED wire. You need only one wire for the (+) turn pulse, but you can pull another for the ground, and others if you intend to do more mods in your door. (Think ahead! What's a little extra wire now, even if you never use it, compared to all this work all over again, eh?)

Pull enough wire into the door cavity to hook up LEDs. CAREFUL HERE! Follow the factory wire route so you don't get it stuck in the path of the window as it moves up and down. There is an unused rubber plug next to the large round one that comes through the door skin behind the panel. I sliced a + pattern in mine and routed the wire through this.

(Rubber plug at bottom with red wire coming out [going in?] - passenger door.)

-- 20 Mirror blinker LED wiring inside door-passenger side

(Driver side. Note extra wires taped to door. Future project!!!)

-- 21 Mirror LED wiring inside drivers door

Notice grounding on each door. On passenger door I used a screw that I installed in a previous mod (express windows) that is a new hole in the door. It has the coiled wire going to it. (Trick: use small Phillips and wrap wire around it tightly, then remove Phillips. Voila!) On the driver door I coiled the wire as well but used the 7mm screw that holds the speaker to the door. (The express windows mod is why you see more wires in my doors than you'll find in yours.)

Leave plenty of wire to attach to LEDs. Install a 2-pin plug (refer to 2 pix above) here so you can remove the mirror housing if you need to without having to cut and reattach the wires. Pull excess wire out of door cavity and into door-to-body loom, leaving just a little excess for movement and working around.

The door sill trim plastic is attached with 3 spring clips. Pull it up at the rearward point where it ends. (Left in pic below.) There are 2 clips here and the 3rd holds the front at the top.

(Door sill trim removed - passenger side.)

-- 22 Door sill trim removed-passenger side


On the passenger side is a panel that you need to pull down slightly to route the wires. It has spring clips as well. Driver side is attached with 2 screws plus clips.

(Panel under dash - passenger side.)

-- 23 Panel under dash-passenger side
 

Attachments

#8 · (Edited)
Re: no side marker - add side bliner in Mirror?

Remove front console covers (left and right). Very carefully route wires to right side of console. Be sure to avoid some of the sharp metal edges under here! On the right side is where you'll find the BCM - Body Control Module. Use the link below to assist with finding the two wires you need for the turn signals. The BCM is labeled J1, J2, and J3. The schematic is labeled with connector colors and pin numbers, plus X1, X2, and X3. J1 = X1, etc. Easy, eh?

Click for electrical schematic for 2008 Gen7

The wires are on the bottom left connector and VERY small! If using schematic above, find figure 11. Right front is dark blue (terminal 56) with white stripe, left front is light blue (terminal 38) with white stripe.

CAUTION ! ! ! DO NOT poke around any wiring harnesses or connectors that are clearly labeled as SIR, Air Bag, or SRS. They will be bright yellow or have bright yellow coverings or markings. You could cause them to activate, costing thousands in repairs.

Use a wire stripper to expose a small amount of copper. Wrap your LED lead around it and solder it. When cool, tape it. Do second connection. Test for operation. (Come on, don't just hit the emergency flasher! You won't know if you hooked them up backwards. :) )

Snap mirrors back in place. Press with palm or flat of hand. It doesn't make a very loud click when it's secure. Gently pull on it to make sure it's attached. Test remote operation.

Here is what mine look like.

(Mirror LEDs lit without glass - passenger side.)

-- 24 Mirror LEDs lit without glass-passenger side


(LED blinker in driver side.)

-- 25 Blinker in drivers mirror


THERE, YOU DID IT!

Now, put everything back together and enjoy. I am!!!

Oh, and show it off! And let me know if you did this or something like it to yours.
 

Attachments

#9 ·
Re: no side marker - add side bliner in Mirror?

WOW! Ask and Ye shall receive! This is a GREAT write-up!

One change I may make is to add a secondary set of LEDs on the back-side of the mirror, on the covering. When you pulled the mirror apart, drill a coupe holes in it for another LED strip.

Once the weather changes (read: isn't 20 and snowing) I am all over this mod!
 
#10 ·
Re: no side marker - add side bliner in Mirror?

Absolutely amazing! What a great writeup DrivenDaily, you went all out on this one. A must do for my Malibu, can't wait till I tackle it myself.

Thank you very much for the time you took to do this and the attention to detail as well.
 
#12 ·
Re: no side marker - add side bliner in Mirror?

Hey DrivenDaily, I just got done doing this mod on my Silverado. I looks great and boy those LEDs are really bright! Since I cut about 4 of them off of the strand, I will try and see if I can solder some wire on the remaining LEDs and use those on the Bu with your write-up. I will get some video up tonight and post day pics tomorrow. Thanks for the inspiration!
 
#13 · (Edited)
Re: no side marker - add side bliner in Mirror?

Cool! I'm so glad that it is already being put to use and that you're excited! That's what really makes it worth the effort.

I'm lookin' forward to the pics, too, man.
 
#15 · (Edited)
Re: no side marker - add side bliner in Mirror?

That looks sa-weet! And a video to boot! Kinda bright at night, eh? Mine are yellow and I've learned to check my mirror first, then signal, which is actually a better habit than what I've had.

In the past I noticed that I would start signalling, then start crowding the line on my side while looking in the mirror. Every so often I would have to retreat to the center of my lane as a car was where I was intending to go. Now I look first, then start moving.

Don't be bashful. Did it go kinda like the How-To for the 'Bu? Was getting the mirror apart to access the inside fairly easy? Do tell, dude. ;)
 
#16 ·
Re: no side marker - add side bliner in Mirror?

Well from a scale from 1 to 10, I rate the difficulty like a 5. I had never taken off the door panels on the truck so that was a first. GMT900 Silverados already have a lot of features pre-wired in the trucks, before I started anything I got under the dash and started poking and prodding wires exiting the BCM. Of course staying away from any yellow ones! After finding the driver and passenger side blinker wires, I took the door panels off and to my surprise there they were, the wires run up to the door and are ready for DL3 signal/power fold mirrors ($350 upgrade) which if I got OEM would be plug-n-play. So took they mirrors down, took the mirror off just as you explained DrivenDaily, fished the wire for the LEDs through, and remounted them. Once mirrors were on firmly I proceeded to find a ground on the door, and finally tap into the blinker wire behind the door panel. Turned on my hazards to insure they worked and put back my panels. Overall the whole thing took about 2 hours, but I think the Bu can get done in half the time. Not too bad considering I worked in the dark and had to find my blinker wires in that spaghetti bowl under the console.

Day pics are on the way.:)
 
#18 · (Edited)
Re: no side marker - add side bliner in Mirror?

That makes my day! Thanks, man!
 
#19 ·
Re: no side marker - add side bliner in Mirror?

Well, I'm happy to say this mod has been done on my Malibu as well! Here is a vid and some pics as well. I only used 3 LEDs on each side, my car is an 08 and already has the side marker. I only added the lights in the mirrors for more piece of mind even though the side markers flash bright enough both at night and daytime.


#20 · (Edited)
Re: no side marker - add side bliner in Mirror?

I like it! I can't see any of the lights or wiring. Were you able to figure out any shortcuts or did it go pretty much like the how-to? How long did it take you?
 
#21 · (Edited)
Re: no side marker - add side bliner in Mirror?

I like it as well, really disappointed I could not use more of the LEDs. After cutting the excess when doing the truck I had 6 left on each piece. Well I tried to solder wire onto one of the leftover pieces and ruined it. I was then left with only 6 LEDs, 3 for each side. Soldered wire on the ends and coated it with liquid electrical tape and tested to make sure they worked. After ensuring they worked I started to take the door panel off (very easy thanks to your write-up), mirrors then came off and ran the wire through the door. I must say the hardest part of the whole mod was running the wire through the door-to-body loom protector. Ran my wire to the BCM and found both of the wires and labeled them (very small wires and tight area to work with but I was determined).

The whole thing took me about three hours, not too bad since I stopped every now and then to have a beer...haha! Two of those were spent on the drivers side and the other on the passenger. The passenger was much easier because I already knew exactly what to do to remove the door panel, the door-to-body loom consisted of less wires so it made fishing it through much faster, and it was closer to the BCM.

If I could do it all over again I would double the amount of LEDs per mirror. Who knows I might redo it in the future but I'm not too worried about it since I have the side markers on my Bu.

On another note, what do you have up your sleeve DrivenDaily? What are those extra wires you ran through there for, I'm dieing to know!

 
#22 · (Edited)
Re: no side marker - add side bliner in Mirror?

The door-to-body was the hardest for me as well. If you end up redoing it in the future, at least all the wires have been run, so it's just a matter of getting the mirror off. But, you might be able to just pop the glass and work it right there, saving a bunch of time!

Since you asked, what's up my sleeve is I'm seeing what I can do to get some heat in those mirrors. If I can get one or two small light fixtures that I can hide inside something to keep the light from escaping then they'll generate some heat for me. I'm also working on getting the remote start to energize the seat heaters, but only when the rear defrost is on, and only when it's cold enough out to need them. But the extra wires in the front doors are for getting the driver's window hooked up to my express module and working with the remote as well. As you may have read in other posts, I can roll all 3 of the other windows up/down from the factory fob, thanks to some fancy wiring at the BCM. The driver's window is still stock.
 
#23 ·
Re: no side marker - add side bliner in Mirror?

I see, I was surprised to find out the mirrors were not heated to begin with. I myself don't mind but for those folks located in areas with colder weather it must be a PITA. When doing my driver side I was stuck there for a little while, I must have sat there for like 15 minutes thinking to myself..........how in the heck did DrivenDaily fish not one but like four wires through this door-to-body thing?..........haha!

I highly recommend this mod for anyone with an 09+ Malibu, the added lighting will give you some more peace of mind on any type of commute and much safer!


#24 ·
Re: no side marker - add side bliner in Mirror?

Heated mirrors aren't exactly a must here - I actually used them more during the summer or foggy periods of time than during the winter on my last car. But it's a rather weird omission on GM's part considering they have them on Aveos and such.

I think the mod could use a bit more refinement, I mean I don't know what kind of space there's to work with there but having a plastic shield of some sort over them (that would also blur the lighting and make it all look less... I dunno, Christmas-ish) would be nice.
 
#26 · (Edited)
Re: no side marker - add side bliner in Mirror?

All,
When I was doing this mod I was looking for a way to add heat to the mirror cavity. If I find a way to do it I'll share it with everyone.

Aprime,
The flexible SMT LED light strips are installed as they came out of the package, lacking only the paper I peeled off of the 3M adhesive strip. I don't have access to any kind of plastic moulding equipment so I chose to use them as they are. They come in a soft, smooth "tube" - they're moulded into the plastic. I guess I could have maybe scuffed them up so the light would be diffused, but I didn't think of that. Darn. I guess I'll just have to be happy with clear, precise dots of light instead of little, blurry spots.

If you were to spend a little time investigating you'd know there's almost no room for the LED strips, let alone a diffuser housing.

I'll say this: The wording of your comment above still seems to be somewhat peevish and insulting, but it's better than the one you left about the guy who was showing off his gray 'Bu and new wheels. Improvement takes time. Keep trying.
 
Status
Not open for further replies.
You have insufficient privileges to reply here.
Top